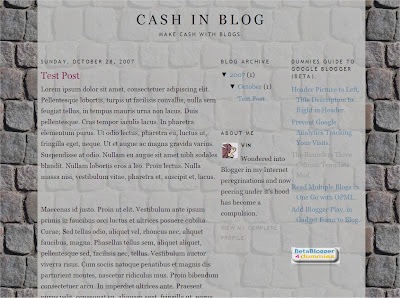
PICTURE BACKGROUND FOR BLOGS
The first step is to find or create the picture you wish to put up as the background. You can create a small picture in any graphics program. It should be small ( around 96x96 pixels would do) and 'tileable'. This means that it should repeat itself without any borders across your web page. To source such graphics from the Internet just do a Google search for 'graphic backgrounds'.
After finding the picture save it to your hard disk (make sure of any copyright conditions). Then upload the picture to Photobucket or Googlepages and copy down he link of the picture.
To put it as the background in your blog login at Blogger.com and click on Layout link on Dashboard. Then click on Edit Html subtab of Template tab. The picture has to cover the whole body of the blog so scroll down to this code in the CSS part of the template :
body {
background:$bgcolor;
margin:0;
color:$textcolor;
font:x-small Georgia Serif;
font-size/* */:/**/small;
font-size: /**/small;
text-align: center;
}
The CSS part of the template is the code which lies between <b:skin><![CDATA[ and ]]></b:skin> tags.
To the above code add these lines :
background-repeat: repeat;
background-image: url(LINK OF PICTURE);
background-attachment:fixed;
so it looks like this :
body {
background:$bgcolor;
background-image: url(LINK OF PICTURE);
background-attachment:fixed;
background-repeat: repeat;
margin:0;
color:$textcolor;
font:x-small Georgia Serif;
font-size/* */:/**/small;
font-size: /**/small;
text-align: center;
}
Replace 'URL OF PICTURE' with the link to your picture. The background-image line shows the location of the picture where you have uploaded it at Photobucket or Googlepages. The background-attachment line fixes the picture so that it does not scroll with the page. The background-repeat line tiles the picture vertically and horizontally if you give it a repeat parameter.
Click Preview and then Save Template. Clear cache and view Blog. Now that your background is ready it is time to make your blog transparent.
TRANSPARENT BACKGROUND FOR BLOGS
To create the transparent background I have used code from Mandarin Designs. To add this code login at Blogger.com and click on Layout link on Dashboard. Then click n Edit Html subtab of Template tab and scroll down to the part of the blog code which you wish to make transparent. To make the followng background transparent :

apply the code change to :
outer-wrapper
code. To apply it to the blog posts only, change the :
main-wrapper
code. This is what it looks like after applying it to posts section :

To apply it to the sidebar change the code in the :
sidebar-wrapper
section in the CSS part of the template. Similarly to apply it to the header or footer change the code in the :
header-wrapper
footer-wrapper
sections.
NOTE : The sections in your blog may have different names depending on the template. Add the code to a section and click on Preview button to see what parts of the blog become transparent.
This is the code to apply :
background-color: silver;
opacity:.850;
filter: alpha(opacity=85);
-moz-opacity: 0.850;
After applying it to the outer-wrapper it will look like this :
#outer-wrapper {
background-color: silver;
opacity:.85;
filter: alpha(opacity=85);
-moz-opacity: 0.85;
width: 1024px;
margin:0 auto;
padding:10px;
text-align:left;
font: $bodyfont;
}
You can change 'silver' to any other colour like 'blue', 'red' to see the effect with that color. This what it looks like with a red filter applied to the outer-wrapper :

Also experiment by changing '0.85' (opacity and moz-opacity) and '85' in filter: alpha(opacity=85) to any number between 0 to 1 in the first and 1 to 100 in the second to vary the transparency or opacity.
This is what it looks like in the demo blog outer-wrapper :

You can see the above code effect in this demo blog. I have given a white color to the various sections and the rest of the blog looks like a transparent skin sliding over a fixed wall (background).
No comments:
Post a Comment